WHAT IS
3D RAD?
CLICK HERE
TO FIND OUT!
GUIWindow

The GUIWindow object allows you to easily add to your projects run-time GUI windows, without any scripting.
For each GUI window, you will be able to define up to 16 controls. Each control can be bound to internal parameters and/or orientation/location properties of other objects in your project, allowing the final user to adjust parameters (and orientation/location) of objects in real-time.
For example, without scripting, you will be able to add GUI controls to a racing game allowing the player to dynamically adjust car parameters (engine, suspensions etc), optionally seeing the changes immediately applied, while test-driving the car.
Each instance of the GUIWindow object will represent one GUI window on the screen. You will be able to add multiple GUIWindow objects to a 3D Rad project to implement multiple GUI windows.
This is useful for example where you need to control multiple parameters of a single object (like for example, screen position of a Sprite object and also the opacity of the same Sprite object). In these cases you can use two or more instances of the GUI object, as shown in the GUIWindowDemo project (in 3D Rad, press Ctrl+O to see a list of available demo projects).
By starting/stopping the GUIWindow object (for example by using event objects or a script) you will be able to hide/show the GUI interface.
Depending on what parameters you choose to link the GUI window controls to, an appropriate control type will be automatically rendered by the GUIWindow object. Supported control types are: orientation editor, location editor, numeric parameter editor.
The graphic layout and controls are provided by AntTweakBar (antisphere.com).
NOTE: unlike 3D Rad built-in sprites, GUI windows will not stretch/shrink with the main display, for example when the user changes the display mode for the finished game. GUI window size/position will be in pixels, not in screen units.
Add the GUIWindow object to your project, link it to all the objects you want to control.
You link objects together in the Object List (left side of 3D Rad main screen), by selecting an object and then checking the other objects you want to link to it.
To configure the GUIWindow object, double-click it in the Object List to open the following property dialog:
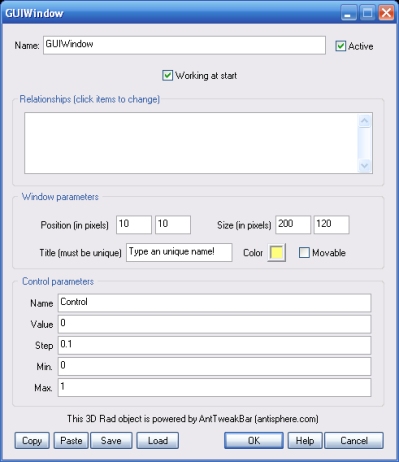
If this option is not checked, the GUIWindow object will not be rendered until it is started by another object.
This list defines what parameters to control for the selected object. The following relationship types are supported:
NOTE: in each of the input boxes above you can specify one or more (comma-separated) parameters. The ability to specify multiple comma-separated parameters in one single input box is useful for orientation/location controls as mentioned above, but also to configure two or more controls, if you have enabled controls for multiple objects listed in the Relationships window.
In this cases, keep in mind that the system will use the parameters based on the order in which the objects are listed in the Relationships window.
So, for example, the first item in the Relationships window will use the first parameter in the input box (the first 3 parameters if it is an orientation/location control), the second item will use the next parameter (or the next 3 parameters if it is an orientation/location control) and so on.
Also note that orientation/location items will always 'take' 3 parameters, even if the don't actually use them. For example, if you have an orientation item and a single parameter item selected in the Relationships window, the parameter input boxes will ALL need to contain 4 parameters. The unique value item will always use the 4th parameter.
In a compiled project running in full-screen (or maximized) mode, a mouse pointer isn't visualized by default, which makes operating GUI windows very difficult. You can however use a Sprite object as mouse pointer by selecting the Work as full-screen mouse pointer option on the Sprite property dialog.
In order to render the sprite over the GUI windows, make sure it is set to Render sprite over texts.